Direct Connect
In this article:
Direct Connect#
General information#
The Direct Connect service provides L3 connectivity between your enterprise network and K2 Cloud via BGP. You thus get a direct link with low latency and guaranteed throughput for accessing K2 Cloud services.
To establish the link, you may colocate your equipment in any of the cloud data centers or rent an external link; 1, 10, and 25 Gbps ports are supported.
Transmission speed |
Standard |
Transmission media |
Distance |
Wavelength |
Connector type |
|---|---|---|---|---|---|
1 Gbit/s |
1000BASE-T |
Twisted pair |
Up to 100 m |
n/a |
RJ-45 |
10 Gbit/s |
10GBASE-SR |
Multimode fiber |
Up to 300 m |
850 nm |
SFP+, |
10 Gbit/s |
10GBASE-LR |
Single mode fiber |
Up to 20 km |
1,310 nm |
SFP+, |
25 Gbit/s |
25GBASE-LR |
Single mode fiber |
Up to 20 km |
1,310 nm |
SFP28, |
Depending on the port speed, the following connection’s bandwidths can be supported:
Connection’s bandwidth, Mbps 1 |
Port speed, Gbps 2 |
|---|---|
50 |
1, 10, 25 |
100 |
1, 10, 25 |
200 |
1, 10, 25 |
300 |
1, 10, 25 |
400 |
1, 10, 25 |
500 |
1, 10, 25 |
1000 |
1, 10, 25 |
2000 |
10, 25 |
3000 |
10, 25 |
4000 |
10, 25 |
5000 |
10, 25 |
10000 |
10, 25 |
15000 |
25 |
20000 |
25 |
25000 |
25 |
The same constraints apply to inbound and outbound traffic, i.e., if you choose, for example, 50 Mbps, then the maximum transfer speed will be 50 Mbps in both directions.
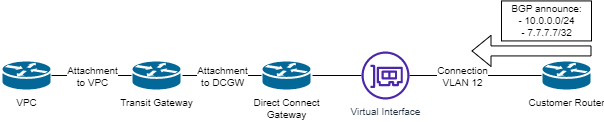
The Direct Connect service includes two main components (for details, see Key concepts):
connection via a physical link between your site and the cloud data center;
virtual interface between the connection and the cloud to access cloud services.
Key concepts#
Connection – A direct link between the enterprise network and the cloud data center with a fixed throughput. To ensure high-availability connection, order two connections to different devices on the cloud side.
LAG – An aggregation group of multiple connections of the same speed in order to increase the throughput. Each connection in LAG must be terminated on the same device on the cloud side. LAG is not intended to provide a high-availability connection.
Virtual Interface – The endpoint of the connection through which cloud services are accessed. For a single connection or LAG, you can create several virtual interfaces (as much as the number of VLANs) and establish a BGP peering for each.
Direct Connect gateway – A virtual router on the cloud side to which virtual interfaces are attached. For user equipment, it acts as the other side with which BGP sessions are established.
Transit gateway – A Direct Connect gateway connects to a VPC via a transit gateway. This connection scheme allows you to access multiple VPCs via a single virtual interface if necessary. The CIDRs of the connected VPCs must not overlap.
Transit gateway association – Connection of a Direct Connect gateway to a transit gateway. A single Direct Connect gateway can be connected to multiple transit gateways, and vice versa, multiple Direct Connect gateways can be connected to a single transit gateway. Routing between Direct Connect gateways through a transit gateway is not supported.
Allowed prefixes – When creating a transit gateway association, you can specify which subnets should be advertised to the user equipment via BGP. Allowed prefixes thus limit the list of IP addresses that can receive user traffic via virtual interfaces. For each association, you must specify at least one advertised prefix, for example, the CIDR of the VPC being accessed.
Route propagation – Routes received via BGP are dynamically installed into the transit gateway’s route tables. Dynamic routes are marked as propagated. By default, route propagation is enabled for all transit gateway attachments.
Billing#
An hourly fee is charged for each Direct Connect connection. This rate consists of:
renting a port/transceiver on the cloud side;
connection’s bandwidth for this port.
Thus, the price per connection depends on the type of connection and the maximum guaranteed speed of traffic that can be transmitted via this connection.
Note
A dedicated connection suggests connecting a Direct Connect gateway to a transit gateway. Each Direct Connect gateway attachment to a transit gateway is charged on an hourly basis, which affects the overall service price.
Usage restrictions#
The Direct Connect service allows you to work with K2 Cloud’s resources, except for:
object storage;
internal load balancers;
internal DNS service;
virtual switches.
BGP constraints#
BGP attributes such as AS-PATH and MED are not used for making a decision to route the traffic via virtual interfaces of the same Direct Connect gateway. To transfer the traffic via a particular virtual interface, advertise more specific prefixes on the client side.
For example, if you advertise the route 10.0.0.0/8 via virtual interface 1, and the routes 10.0.0.0/9 and 10.128.0.0/9 via virtual interface 2, then all outbound traffic from the cloud towards the 10.0.0.0/8 network will be routed via virtual interface 2. If the connection via virtual interface 2 is lost, the more specific routes 10.0.0.0/9 and 10.128.0.0/9 will be automatically removed and the traffic will be sent along the less specific path via virtual interface 1.
Resource quotas#
The following default quotas are allocated to the service resources:
10 connections per a project in each region;
50 direct connect gateways per project in each region;
4 virtual interfaces per connection or LAG;
10 LAGs per project in each region;
10 transit gateways associations with a Direct Connect gateway;
30 virtual interfaces per Direct Connect gateway;
200 allowed prefixes per transit gateway association;
100 advertised prefixes on the client’s side per virtual interface (fixed limit).
To increase quotas, contact the support service via the support portal or by email support@k2.cloud. Maximum quota for advertised prefixes is 1,000 per a virtual interface.
Important
When the limit on the number of announced prefixes is reached, the cloud stops learning new routes and the BGP session is terminated.
BGP quotas#
When negotiating a BGP neighborship, the BGP timer is set to the lowest supported value:
hold timer: default – 90 s, minimum – 3 s;
keepalive timer: default – 30 s, minimum – 1 s;
graceful restart timer – 120 s.
BFD quotas#
BFD settings on the cloud infrastructure side:
RX interval: 300 ms
TX interval: 300 ms
Multiplier: 3
Equipment requirements#
To receive the Direct Connect service, the customer should colocate their equipment in K2 Cloud data centers or provide a connection to the infrastructure outside our data centersby renting a communication channel from a telecom operator. The equipment can be placed at any connection point, since the service makes it possible to connect to resources in any of them.
In K2 Cloud data centers, connection to Direct Connect is provided by the following ISPs 3:
Provider |
ru-msk-vol51 4 |
ru-msk-vol52 5 |
ru-msk-comp1p 6 |
|---|---|---|---|
– |
– |
L3VPN, L2VPN, dark fiber |
|
Mastertel (Marathon) |
L2VPN |
L2VPN |
L2VPN |
L3VPN, L2VPN |
– |
L3VPN, L2VPN |
|
– |
– |
L3VPN, L2VPN, L1 lambda, dark fiber |
|
– |
– |
L3VPN, L2VPN, L1 lambda, dark fiber |
|
L3VPN, L2VPN, L1 lambda, dark fiber |
L3VPN, L2VPN, L1 lambda, dark fiber |
L3VPN, L2VPN, L1 lambda, dark fiber |
|
– |
– |
L3VPN, L2VPN, L1 lambda, dark fiber |
|
L3VPN, L2VPN, L1 lambda, dark fiber |
L3VPN, L2VPN, L1 lambda, dark fiber |
L3VPN, L2VPN, L1 lambda, dark fiber |
|
L2VPN |
L2VPN |
L2VPN |
|
– |
– |
L2VPN |
|
– |
L3VPN, L2VPN, L1 lambda, dark fiber |
L3VPN, L2VPN, L1 lambda, dark fiber |
|
L3VPN, L2VPN, L1 lambda, dark fiber |
L3VPN, L2VPN, L1 lambda, dark fiber |
L3VPN, L2VPN, L1 lambda, dark fiber |
|
L2VPN, dark fiber |
L2VPN, dark fiber |
L2VPN, dark fiber |
- 3
If your ISP is not listed in the table, please check the connection option with the support service.
- 4
Connection point to the cloud via Direct Connect in the “Volochaevskaya-1” data center
- 5
Connection point to the cloud via Direct Connect in the “Volochaevskaya-2” data center
- 6
Connection point to the cloud via Direct Connect in the “Kompressor” data center
The equipment in use must support both BGP (IPv4 Unicast) for route information exchange with the cloud and 802.1Q standard for VLAN encapsulation. Using BGP and tagged traffic is mandatory. Routing protocols other than BGP are not supported.
If you need link aggregation to increase throughput, then your equipment must have LACP support enabled.
Traffic is not encrypted, which is why IPSec or other secure traffic transfer methods should be used to protect data in transit between endpoints. Cloud equipment does not support MACSec.
Direct Connect supports transmission of IP packets with a maximum MTU size of 9,000 bytes. This MTU size is used all the way from the customer’s equipment connection point to the VPC.
Request for connection#
To establish a Direct Connect connection to K2 Cloud, leave a request on the support portal or email us at support@k2.cloud.
The request should specify:
number of physical links;
throughput of each link;
speed limits for ports the links are connected to;
transmission medium type and transceiver type (see table with supported port speeds and transmission media);
Important
We install transceivers into the equipment on the cloud side, while the customer installs them into the equipment on their side. Customer-purchased transceivers shall not be installed into the cloud equipment. The customer may purchase transceivers from us to install into their equipment.
the data center(s) to which the connection is to be established;
whether the connection is to be established to single or multiple devices on the K2 Cloud side 7;
desired VLAN IDs for each connection or LAG.
- 7
If links are connected to one device, the respective connections can be aggregated into a group to increase the throughput. Connecting links to different devices provides a high-availability connection between your enterprise network and сloud.
Note
To establish a high-availability connection, we recommend ordering at least two links and connect them to different devices or data centers.
After processing the request, our engineers will contact you for additional information (if required). The service is provided if technically feasible as per your service plan.
Connection setup at the user’s side#
Once the communication links are installed, a support service engineer will inform you about the connections and allocated VLAN IDs. Thereafter, you will be able to create virtual interfaces to work with K2 Cloud services. You can view available connections and groups of connections via the API or web interface.
Note
To reorganize or delete a group of connections, contact the support service via the support portal or by email support@k2.cloud.
When a virtual interface is created, it is associated with a specific VLAN ID. For each virtual interface, configure BGP routing on your equipment. If necessary, you can delete virtual interfaces and create new ones with different settings.
You can configure BGP routing on the client side in advance by specifying the cloud and client IP addresses from a 169.254.252.0/22, 10.0.0.0/8, 172.16.0.0/12 or 192.168.0.0/16 subnet. Both addresses must belong to the same /30 CIDR block. The BGP session will be established only after creating a virtual interface. To configure the interface, you must specify the same cloud and client IP addresses.
To detect connection failures faster and speed up routing convergence, you can use the BFD protocol. It is enabled by default on the cloud infrastructure side and cannot be disabled. If necessary, enable BFD on your hardware. The settings of the BFD protocol for the cloud infrastructure are specified in the section Quotas of BFD.
Establishing access to a VPC (general approach)#
To establish access to a VPC on the cloud side, do the following.
Order the Direct Connect service from the support service.
Create a virtual interface on the Direct Connect gateway.
Create a transit gateway if it was not created earlier and attach the target VPC to it.
Create an association between the Direct Connect gateway and the transit gateway.
Add to the VPC route table routes to those user subnets, which user equipment advertises to the cloud.
Establishing access to the VPC via Direct Connect.#
Managing Direct Connect gateways#
Create a Direct Connect gateway#
Go to Interconnect section Direct Connect Gateways.
Click Create.
In the window that opens, specify the gateway name and the autonomous system number (ASN). Use numbers from private ranges (64512–65534 and 4200000000–4294967294) as the ASN.
If you need to assign tags, proceed to the next step by clicking Add tags. To set the Name tag, click Add Name tag and enter the tag value. To set a custom tag, click Add tag and enter the tag key and value.
Once all parameters are set, click Create.
Create a transit gateway association#
When an association is created, a connection is created between the Direct Connect gateway and the transit gateway.
Go to Interconnect section Direct Connect Gateways.
Select the Direct Connect gateway in the resource table.
Click Create association.
In the window that opens, select the transit gateway with which you want to establish an association. In the Allowed prefixes field, specify at least one CIDR block that will be announced through the virtual interfaces attached to the gateway.
Important
If a Direct Connect gateway connects to multiple transit gateways, the allowed prefixes for each association must not overlap.
Once all parameters are set, click Create.
You can also create an association in the Associations tab on the Direct Connect gateway page.
Change allowed prefixes for the association#
Go to Interconnect section Direct Connect Gateways.
Find the Direct Connect gateway in the resource table and click its ID to go to the gateway page.
Open the Associations tab and select the association in the resource table.
Click Change.
In the Allowed prefixes field, add, modify, and/or remove advertised CIDR blocks. After all changes, the field must contain at least one prefix.
Click Save to save changes.
Delete a transit gateway association#
Go to Interconnect section Direct Connect Gateways.
Select the Direct Connect gateway in the resource table.
Click Delete association.
In the window that opens, confirm the deletion.
You can also delete an association in the Associations tab on the Direct Connect gateway page.
Delete a Direct Connect gateway#
Note
To delete a Direct Connect gateway, first delete all of its associations and virtual interfaces.
Go to Interconnect section Direct Connect Gateways.
Select the Direct Connect gateway in the resource table.
Click Delete.
In the window that opens, confirm the deletion.
You can also delete the gateway in the Information tab on the Direct Connect gateway page.
Virtual interface management#
Create a virtual interface#
Note
When a virtual interface is created, three alarms are automatically set for the AcceptedRoutes metric:
“High” with the threshold equal to 70% of the quota for learned routes;
“Critical” with the threshold equal to 90% of the quota;
“Limit” with the threshold equal to 100% of the quota.
To receive notifications that the threshold is exceeded, configure sending notifications upon alarm triggering.
Go to the section Interconnect Direct Connect Virtual interfaces.
Click Create.
In the window that opens, set the virtual interface and BGP session parameters:
Virtual interface name.
The Direct Connect gateway where the virtual interface is created.
The connection or LAG for which the virtual interface is created.
VLAN ID within the connection or LAG via which the virtual interface traffic will be transmitted.
BGP authentication key. BGP authentication is required to establish a BGP peering. You cannot create a virtual interface without enabling BGP authentication. When you create a virtual interface, an MD5 BGP authentication key is generated automatically. You can specify your own authentication key. It must be between 6 and 80 characters long and can consist of numbers, uppercase or lowercase Latin letters, and hyphens (
-).The IP address on the cloud side. You can set your own address or leave the default one. The IP address must be in a 169.254.252.0/22, 10.0.0.0/8, 172.16.0.0/12 or 192.168.0.0/16 subnet and belong to the same /30 subnet as the client IP address.
Client BGP ASN. It must be different from the cloud BGP ASN that you set for the Direct Connect gateway.
The IP address on the client side. You can set your own address or leave the default one. The IP address must be in a 169.254.252.0/22, 10.0.0.0/8, 172.16.0.0/12 or 192.168.0.0/16 subnet and belong to the same /30 subnet as the cloud IP address.
Important
If the /30 subnet containing the cloud and client IP addresses belongs to a 10.0.0.0/8, 172.16.0.0/12 or 192.168.0.0/16 subnet and its IP addresses are overlapping VPC’s IP addresses, then those VPC’s addresses will not be accessible from the infrastructure connected via Direct Connect.
Note
When configuring routing on the client side, set the same BGP parameters (IP addresses and ASN).
If you need to assign tags, proceed to the next step by clicking Add tags. To set the Name tag, click Add Name tag and enter the tag value. To set a custom tag, click Add tag and enter the tag key and value.
Once all parameters are set, click Create.
A virtual interface can also be created in the Virtual interfaces tab on the page of the connection / LAG.
Delete a virtual interface#
Go to the section Interconnect Direct Connect Virtual interfaces.
Select the virtual interface in the resource table.
Click Delete.
In the window that opens, confirm the deletion.
You can also delete a virtual interface in the Virtual interfaces tab on the page of the relevant connection / LAG.
Alarm setup#
С помощью алармов можно настроить выполнение заданного действия, когда параметры виртуального интерфейса или соединения Direct Connect выходят за заданное критическое значение. В зависимости от типа ресурса (измерения в терминологии CloudWatch) поддерживаются следующие метрики:
Metrics |
Description |
Resource type |
|---|---|---|
VirtualInterfaceBpsEgress |
Egress traffic rate, bits per second |
Virtual interface, connection |
VirtualInterfaceBpsIngress |
Ingress traffic rate, bits per second |
Virtual interface, connection |
VirtualInterfacePpsEgress |
Egress traffic rate, packets per second |
Virtual interface, connection |
VirtualInterfacePpsIngress |
Ingress traffic rate, packets per second |
Virtual interface, connection |
BGPSessionState |
BGP session state |
Virtual interface |
BFDSessionState |
BFD session state |
Virtual interface |
AcceptedRoutes |
Number of accepted routes |
Virtual interface |
The metrics are collected every minute. The rate metrics measure average traffic per period. The state metrics account for the session state (active/inactive) at the time of measuring. For a BGP session, -1 means that the session was reset since the maximum number of routes was exceeded. When a connection metric is calculated, metrics of all virtual interfaces included in such connection are taken into account.
Create alarm#
Note
Alarm can also be created in the section Monitoring Alarms.
Go to the respective section to create an alarm for:
Virtual interface: Interconnect Direct Connect Virtual interfaces.
Connection: Interconnect section Direct Connect Connections.
Find the desired resource in the table and click the ID to go to its page.
Open the Alarms tab and click Create.
In the window that opens, select the monitored metrics and press :bdg-primary`Next`.
Set alarm metrics (for details, see Alarms section):
the alarm name and, optionally, its description;
statistics;
the condition of triggering an alarm for the selected metric. It includes a comparison operator and a threshold value;
the number and duration of time periods, over which metric values are collected.
If necessary, you can also change the metric selected in the previous step.
Если вам не требуется настраивать действия по аларму, пропустите этот шаг. В противном случае нажмите Настроить действия. В качестве возможных действий вы можете задать отправку сообщения на электронную почту или выполнение политики для группы Auto Scaling.
Once you have made all the required adjustments, click Create.
Change the alarm#
Go to the respective section to change the alarm for:
Virtual interface: Interconnect Direct Connect Virtual interfaces.
Connection: Interconnect section Direct Connect Connections.
In the table, find the resource for which the alarm is set and click on its ID to go to the resource page.
Open the Alarms tab, select the desired alarm in the table and click Modify.
The dialog window will open at the Parameters step. Modify the required alarm parameters:
description;
statistics;
monitored metrics;
the condition of triggering an alarm for the selected metric. It includes a comparison operator and a threshold value;
the number and duration of time periods, over which metric values are collected.
Если вам не требуется настраивать действия по аларму, пропустите этот шаг. В противном случае нажмите Настроить действия. В качестве возможных действий вы можете задать отправку сообщения на электронную почту или выполнение политики для группы Auto Scaling.
Once you have made the required changes, click Modify to save them.
Delete the alarm#
Go to the respective section to delete an alarm for:
Virtual interface: Interconnect Direct Connect Virtual interfaces.
Connection: Interconnect section Direct Connect Connections.
In the table, find the resource wherein the alarm(s) should be deleted and click on its ID to go to the resource page.
Open the Alarms tab and select the alarm to be deleted in the alarm table. You can select multiple alarms at once.
Click Delete and confirm the action in the dialog window.
Viewing resource information#
General information about a specific resource type — a connection, LAG, Direct Connect gateway, and virtual interface — can be found by its ID in the resource table in the corresponding subsection of the Direct Connect service. To view details of a particular resource, go to its page.
Information about a connection#
To open the connect page, go to section Interconnect Direct Connect Connects. Find the necessary connection in the resource table and click its ID.
The Information tab displays the main connection parameters:
name;
value of the Name tag;
location — a physical site where the connection is terminated;
throughput;
ID of the device where the connection is terminated;
IDs of free VLANs without virtual interfaces;
IDs of used VLANs with virtual interfaces;
link aggregation group to which the connection belongs (if applicable);
number of virtual interfaces attached to the connection.
The Virtual interfaces tab contains a table with the summary information about the virtual interfaces attached to this connection. More details of a particular interface can be viewed on its page.
In the tab, you can create virtual interfaces for this connection and delete existing ones.
In the Metrics tab, you can view the graphs of the monitored metrics. You can set the period the metric graph covers, statistics, and metric calculation interval. To automatically refresh the graph, enable Auto-refresh; to refresh it manually, click Refresh.
Important
Automatic refresh is not possible when a custom period and/or interval is selected.
The Alarms tab displays details of alarms configured for the resource:
state;
alarm name;
triggering condition.
Alarms can be filtered by a state and/or metrics.
Here you can create, modify or delete an alarm.
The Tags tab displays the tags assigned to the connection. You can add tags, edit keys and values, and delete tags. Learn more about using tags.
Information about an LAG#
To open the page of an LAG, go to the section Interconnect Direct Connect LAG. Find the necessary LAG in the resource table and click its ID.
The Information tab displays the main group parameters:
group name;
value of the Name tag;
location — a physical site where the LAG is terminated;
bandwidth — the speed of an individual connection that belongs to the LAG;
number of connections in the LAG;
minimum number of connections — if the number of available connections in the LAG drops below the minimum, the LAG is completely disabled because the remaining connections cannot transmit the required amount of traffic;
the number of virtual interfaces attached to the LAG.
The Connections tab contains a table with the summary information about the connections that belong to the LAG. More details of a particular connection can be viewed on its page.
The Virtual interfaces tab contains a table with the summary information about the virtual interfaces attached to the LAG. More details of a particular interface can be viewed on its page.
In the tab, you can create virtual interfaces for the LAG and delete existing ones.
The Tags tab displays the tags assigned to the LAG. You can add tags, edit keys and values, and delete tags. Learn more about using tags.
Information about the Direct Connect gateway#
To open the Direct Connect gateway page, go to the section Interconnect* Direct Connect Gateways. Find the necessary gateway in the resource table and click its ID.
The Information tab displays the main gateway parameters:
gateway name;
value of the Name tag;
BGP ASN;
the number of associations with the transit gateway;
the number of attached virtual interfaces.
Here you can delete the gateway.
The resource table in the Associations tab displays the following information about the associations:
ID;
transit gateway with which the association is established;
transit gateway attachment, which corresponds to the association;
allowed prefixes specified in the association.
In the tab, you can create other associations with transit gateways, change allowed prefixes for a particular association, and delete existing associations.
The Virtual interfaces tab contains a table with the summary information about the virtual interfaces attached to this gateway. More details of a particular interface can be viewed on its page.
In the tab, you can create virtual interfaces for this gateway and delete existing ones.
The Tags tab displays the tags assigned to the Direct Connect gateway. You can add tags, edit keys and values, and delete tags. Learn more about using tags.
Virtual interface information#
To open a virtual interface page, go to Interconnect Direct Connects Virtual Interfaces. Find the desired virtual interface in the resource table and click on its ID.
The Information tab displays the main interface parameters:
network interface name;
value of the Name tag;
location – the physical site hosting the connection or LAG to which the virtual interface is attached;
connection or LAG to which the virtual interface is attached;
VLAN transmitting the traffic to this virtual interface;
BGP authentication key;
Direct Connect gateway to which the virtual interface is attached;
ID of the device to which the connection / LAG is attached;
BGP ASN on the client side;
IP address of the connection endpoint on the client side;
BGP ASN of the Direct Connect gateway;
IP address of the connection endpoint on the cloud side.
Here you can delete a virtual interface.
In the Metrics tab, you can view the graphs of the monitored metrics. You can set the period the metric graph covers, statistics, and metric calculation interval. To automatically refresh the graph, enable Auto-refresh; to refresh it manually, click Refresh.
Important
Automatic refresh is not possible when a custom period and/or interval is selected.
The Alarms tab displays details of alarms configured for the resource:
state;
alarm name;
triggering condition.
Alarms can be filtered by a state and/or metrics.
Here you can create, modify or delete an alarm.
The Tags tab displays the tags assigned to the virtual interface. You can add tags, edit keys and values, and delete tags. Learn more about using tags.