
ACL
In this article:
ACL#
General information#
Access Control Lists (ACLs) act as firewalls at the subnet level. When creating a VPC, a default ACL is also created. It is assigned to each subnet being created and permits all inbound and outbound traffic. The relevant rules are shown in the tables below.
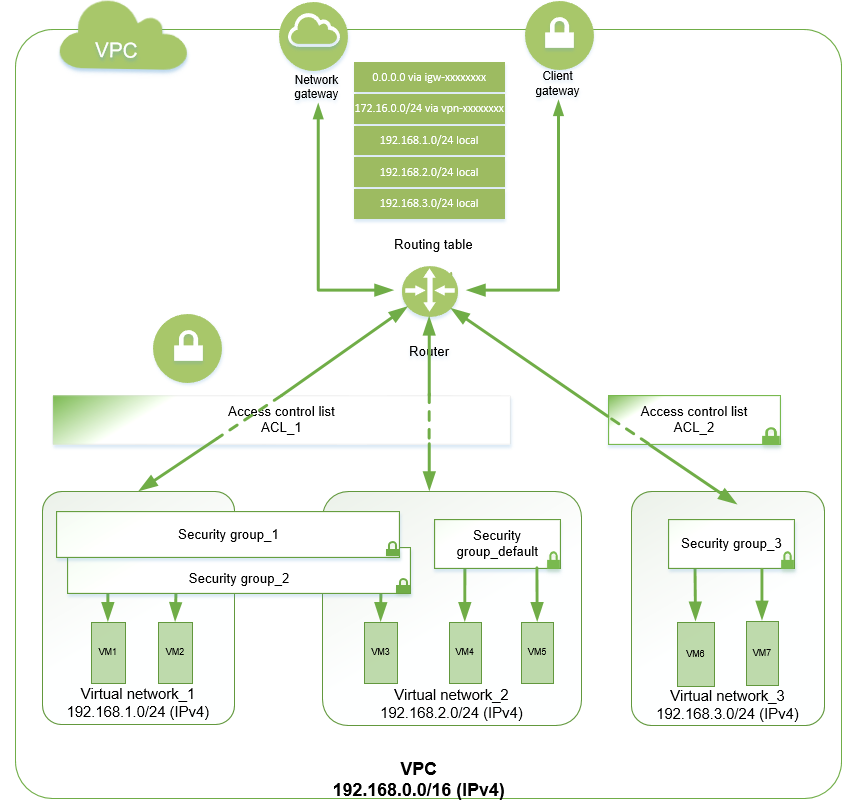
Once a subnet is created, you can associate your access control list with it. The figure shows how ACLs can be associated with subnets and security groups, with network interfaces. For example, you may associate an ACL with several subnets.
Rule number |
Protocol |
CIDR |
Ports |
Action |
|---|---|---|---|---|
100 |
all(-1) |
0.0.0.0/0 |
Allow |
|
32767 |
all(-1) |
0.0.0.0/0 |
Deny |
Rule number |
Protocol |
CIDR |
Ports |
Action |
|---|---|---|---|---|
100 |
all(-1) |
0.0.0.0/0 |
Allow |
|
32767 |
all(-1) |
0.0.0.0/0 |
Deny |
Attention
If the ACL is assigned to a subnet attached to a transit gateway, then outbound ACL rules will not be applied to the traffic coming from the transit gateway.
Billing#
Network ACLs are free of charge.
Available quotas#
The following default quotas are allocated for ACLs:
200 ACLs per a VPC;
20 rules in each direction per an ACL.
If necessary, you can increase quotas. To do this, contact the support service via the support portal or by email support@k2.cloud.
Operations with ACLs#
Create an ACL#
In the top menu of the web interface, select the project and region where you want to create an ACL.
Expand the side menu by clicking .
Go to Networking ACLs. To find the section quickly, you can use the menu search.
Click Create.
In the ACL creation dialog, specify the VPC where you want to create an ACL.
If you need to set a tag, click Add tag and specify the tag key and value. To assign more tags, click Add tag again.
To complete the ACL creation, click Create.
The created ACL will contain two rules that prohibit all inbound and outbound traffic, but they will have the lowest priority. Follow the link with the ACL ID to specify your own rules, assign ACL to subnets, and view the list of associated subnets and general information about this ACL.
Associate an ACL with a subnet#
In the top menu of the web interface, select the project and region where you want to associate an ACL with a subnet.
Expand the side menu by clicking .
Go to Networking ACLs. To find the section quickly, you can use the menu search.
Select the ACL in the resource table.
In the pop-up action bar, click Associate with subnets.
From the drop-down list in the window that opens, select the subnet to which the ACL should be assigned. You can select multiple subnets at once by ticking next to the desired subnets. To deselect, clear the checkbox.
Note
You can assign only one ACL to a subnet, but you can assign another one any time later, and it will automatically replace the previously assigned ACL.
To complete the action, click Associate.
This operation can also be performed on the ACL page. To do this, go to its page and click Associate with subnets.
If you want to know what subnets are associated with a specific ACL, open the Subnets tab on the ACL page.
Delete ACL#
Important
Before deleting an ACL, make sure it is not associated with any subnet. If the ACL you are going to delete is associated with a subnet, then first associate another ACL with it.
In the top menu of the web interface, select the project and region where you want to delete an ACL.
Expand the side menu by clicking .
Go to Networking ACLs. To find the section quickly, you can use the menu search.
Select the ACL in the resource table.
In the pop-up action bar, click Delete.
In the dialog window, confirm the action.
This operation can also be performed on the ACL page. To do this, go to its page and click Delete.
Attention
The default ACL cannot be deleted.
Working with rules#
Each ACL has numbered inbound and outbound rules to permit or prohibit traffic at the subnet level. The rules are applied in order of priority, which depends on the rule number: the lower the number, the higher the priority of the rule and vice versa. We recommend that you first create rules with numbers divisible by 100. Thus, you will avoid problems when adding a rule with an intermediate priority between two existing rules. The maximum rule number is 32766.
Attention
An ACL cannot contain two rules of the same direction with the same number.
Create a rule#
In the top menu of the web interface, select the project and region where you want to create an inbound or outbound rule for an ACL.
Expand the side menu by clicking .
Go to Networking ACLs. To find the section quickly, you can use the menu search.
Find the ACL in the resource table and click its ID to go to the ACL page.
Open the required Inbound rules or Outbound rules tab and click Add.
In the window that opens, set the required parameters:
Rule number.
Rule type.
Protocol — You can set the rule for all protocols or select a specific protocol from the list. If there is no required protocol on the list, select
Other.Protocol number — If the protocol is not on the list, set its number according to IANA.
Port access — For TCP and UDP, specify whether access is granted to/from all ports or ports from a specific range.
Ports — If you select access for some ports only, specify a comma-separated list of ports and/or port ranges.
Note
A separate rule will be created for each port or port range in the list.
Grant access — You can grant access for all IP addresses or a specified network.
Network — If you select
From networkorTo network(in inbound or outbound rules, respectively), specify the network in CIDR notation.
To complete the rule creation, click Create.
Once the addition is confirmed, the subnets, which this ACL is associated with, will filter traffic according to the new security rules.
Modify a rule#
In the top menu of the web interface, select the project and region where you want to modify an inbound or outbound rule for an ACL.
Expand the side menu by clicking .
Go to Networking ACLs. To find the section quickly, you can use the menu search.
Find the ACL in the resource table and click its ID to go to the ACL page.
Open the required Inbound rules or Outbound rules tab.
In the rule table, select the rule and, in the pop-up action bar, click Modify.
In the window that opens, you can edit the following parameters:
Rule type.
Protocol — You can set the rule for all protocols or select a specific protocol from the list. If there is no required protocol on the list, select
Other.Protocol number — If the protocol is not on the list, set its number according to IANA.
Port access — For TCP and UDP, specify whether access is granted to/from all ports or ports from a specific range.
Ports — If you select access for some ports only, specify a comma-separated list of ports and/or port ranges.
Note
A separate rule will be created for each port or port range in the list.
Grant access — You can grant access for all IP addresses or a specified network.
Network — If you select
From networkorTo network(in inbound or outbound rules, respectively), specify the network in CIDR notation.
To complete the editing, click Modify.
Once the changes are confirmed, subnets, which this ACL is associated with, will filter traffic according to the new security rules.
Delete a rule#
In the top menu of the web interface, select the project and region where you want to delete an inbound or outbound rule for an ACL.
Expand the side menu by clicking .
Go to Networking ACLs. To find the section quickly, you can use the menu search.
Find the ACL in the resource table and click its ID to go to the ACL page.
Open the required Inbound rules or Outbound rules tab.
Select the desired rule and click Delete in the pop-up action bar. You can select multiple rules at once by ticking next to the desired rules. To deselect, clear the checkbox.
In the window that opens, confirm the deletion.
Information on the ACL#
For general information about available ACLs, see the ACLs subsection. To view all ACLs in the project, select All VPC in the VPC filter. To display ACLs from a particular VPC, select the desired VPC in the filter.
To simplify finding an ACL in the table, you can select the VPC in which the ACL was created in the VPC filter, or use the table search.
Once you have selected the desired ACL, click its ID. The ACL page will open.
The Information tab displays the main ACL characteristics:
whether it is a default ACL (Yes/No);
VPC where the ACL was created;
number of subnets with which the ACL is associated.
Here you can:
The Inbound rules tab displays a table with details of inbound rules:
rule number;
protocol;
CIDR block of IP addresses from which access is allowed;
ports;
rule-triggered action.
Here you can add, modify or delete an inbound rule.
The Outbound rules tab displays a table with details of outbound rules:
rule number;
protocol;
CIDR block of IP addresses to which access is allowed;
ports;
rule-triggered action.
Here you can add, modify or delete an outbound rule.
Assigning an ACL to at least one subnet enables the Subnets tab where you can see a table with details of subnets to which this ACL is assigned:
subnet ID;
CIDR block of IP addresses;
whether it is a default subnet (Yes/No).
Here you can also associate an ACL with subnets.
In the Tags tab, you can view tags assigned to the ACL. Here you can also add, modify, and delete tags.